Assess workplace risks with the EMKG method
Run a structured risk assessment for inhalation, skin, eye, fire, and storage hazards using the EMKG control banding approach.
The EMKG wizard guides you through a risk assessment for a specific product. It determines the required control level based on the product's hazard group, the quantity used, and how the product is released into the workplace. Control levels range from basic hygiene practices up to fully enclosed systems.
EMKG stands for Einfaches Maßnahmenkonzept Gefahrstoffe, the Easy-to-use Workplace Control Scheme for Hazardous Substances, developed by BAuA.
Start an assessment
Open any product from your library, then select the EMKG tab. The wizard has four steps.
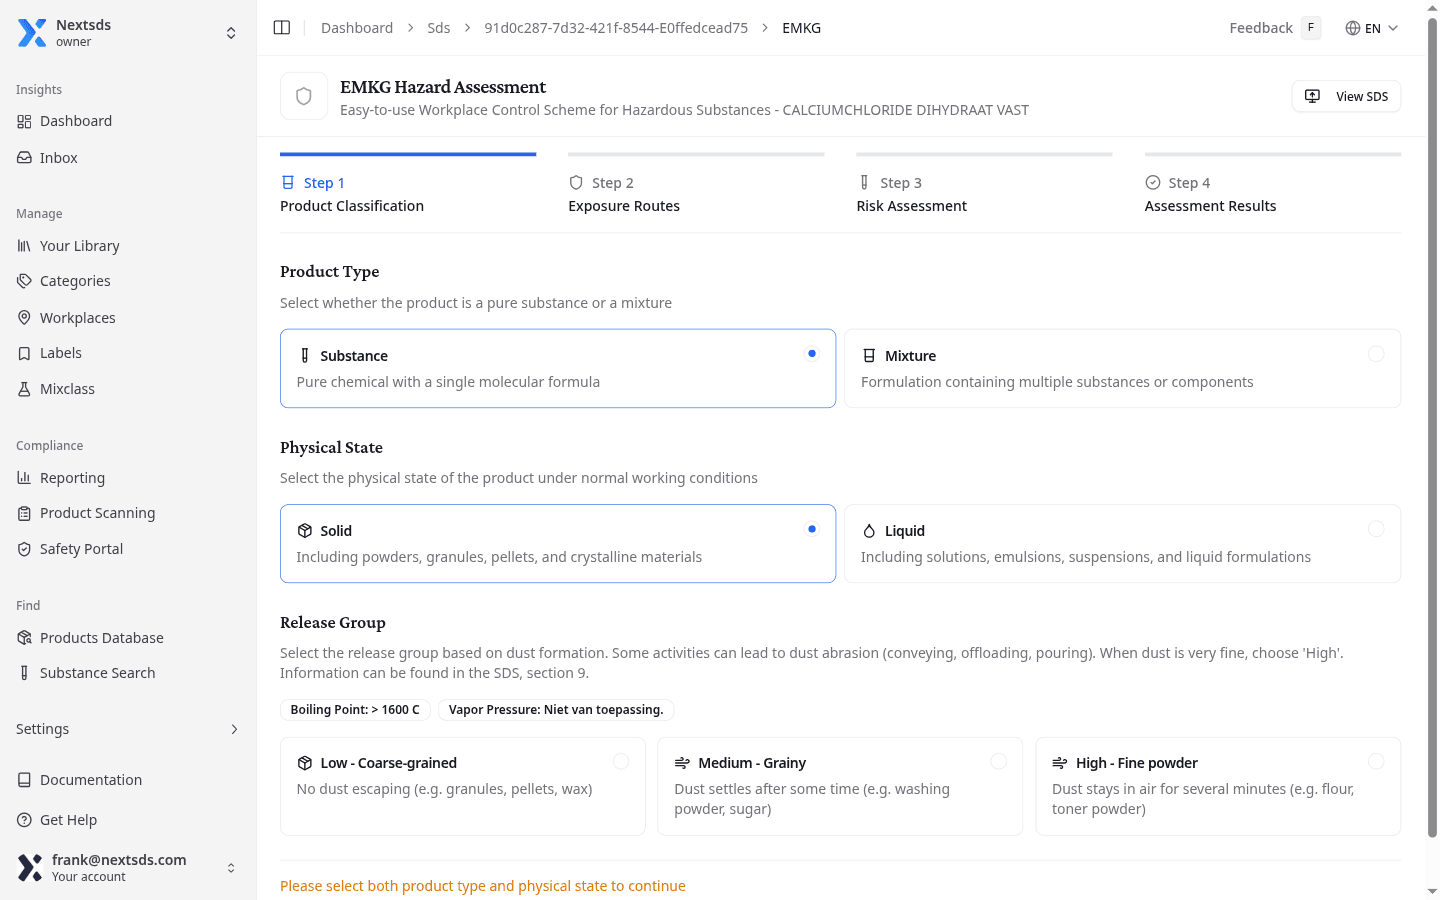
Step 1: Classify the product
Select whether the product is a Substance (pure chemical) or Mixture (formulation with multiple components). Then select the Physical State: Solid (powders, granules, pellets) or Liquid (solutions, emulsions, suspensions). NextSDS pre-selects these where the SDS data makes it clear.
Once a physical state is selected, choose the Release Group: how easily the substance becomes airborne or dispersed during handling. Select Low, Medium, or High. NextSDS displays the boiling point and vapour pressure from the SDS alongside the options to help you choose.
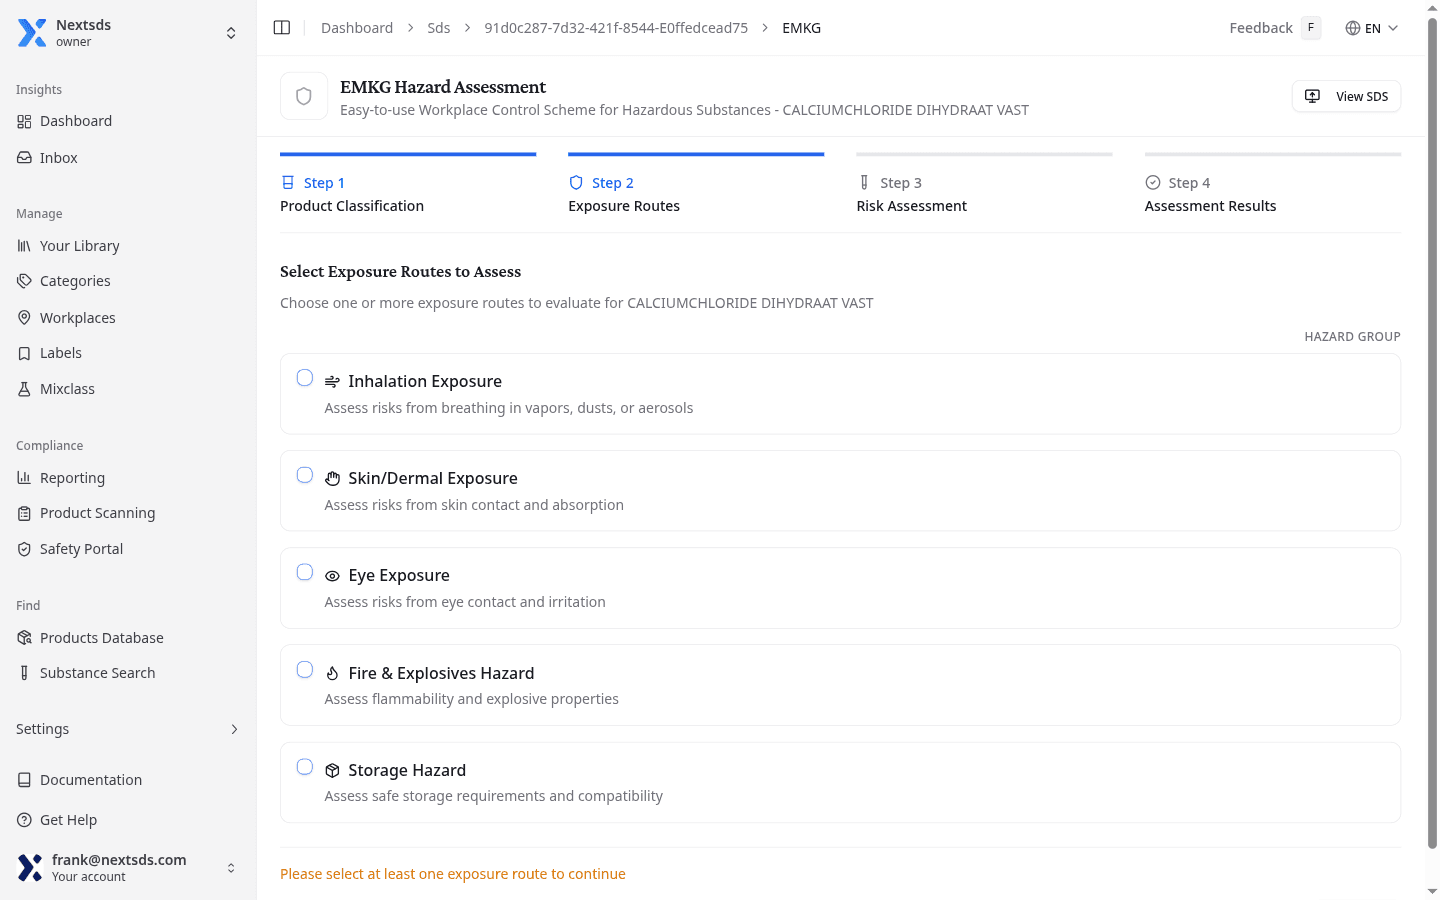
Step 2: Select exposure routes
Choose which exposure pathways to assess. Each route shows the product's hazard group on a colour-coded scale (A = lowest risk, E = highest):
| Route | What it assesses |
|---|---|
| Inhalation Exposure | Breathing in vapours, dusts, or aerosols (groups A–E) |
| Skin/Dermal Exposure | Skin contact and absorption (groups HA–HE) |
| Eye Exposure | Eye contact and irritation (groups Au-A–Au-C) |
| Fire & Explosives Hazard | Flammability and explosion risk (groups pc-A–pc-E) |
| Storage Hazard | Hazards during storage (groups La-A–La-F) |
Select at least one route to continue.
Step 3: Answer assessment questions
For each selected route, answer questions about how the product is used in your workplace.
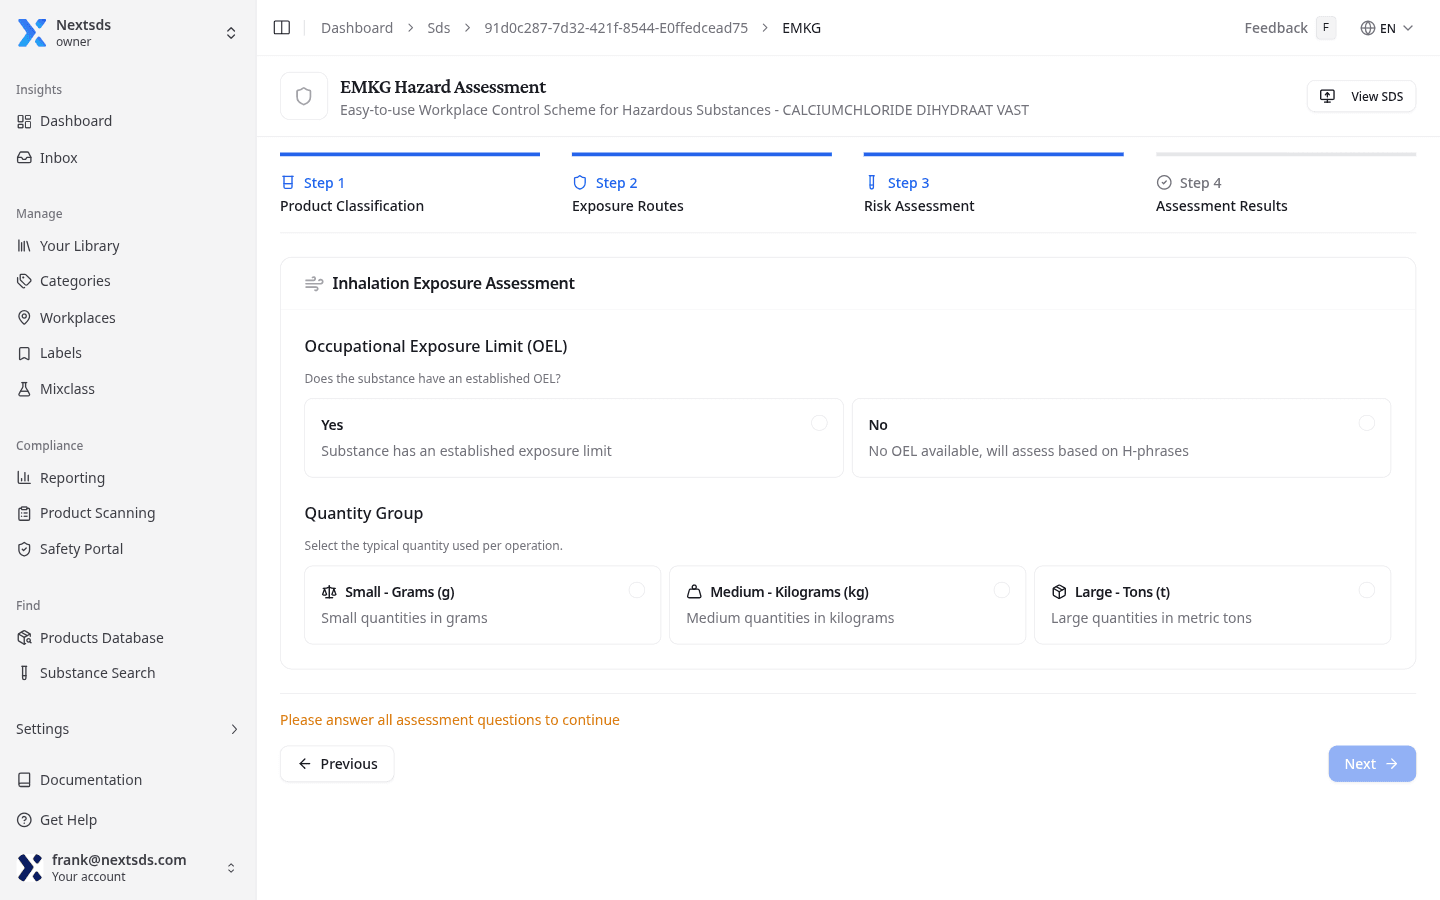
Inhalation
- Occupational Exposure Limit (OEL): whether an established exposure limit exists. If yes, select the OEL range (in mg/m³ for solids or ppm for liquids) to determine the hazard group directly.
- Quantity Group: the amount used per operation: small (millilitres/grams), medium (litres/kilograms), or large (cubic metres/tonnes). Setting this here syncs the value to the Eyes and Fire & Explosives routes automatically.
- Application Method (liquids only): whether the product is sprayed. Spraying automatically sets the release group to high.
- Product Dilution (liquids only, when not sprayed): whether the product is diluted with water. Dilution automatically sets the release group to low.
Skin
- Effective Area: small (only a few splashes) or large (hands or forearms). Do not account for protective equipment.
- Duration of Skin Contact: short (under 15 minutes per day) or long (over 15 minutes per day). Repeated contact is added over the full day.
Eyes and Fire & Explosives
Both routes ask one question:
- Quantity Group: small, medium, or large. If you set the quantity group for inhalation first, this field is pre-filled with the same value.
Storage
- Storage Quantity: under 50 kg, up to 200 kg, up to 1 000 kg, or over 1 000 kg.
Step 4: Review results
The wizard calculates a control level for each exposure route:
| Control level | What it means |
|---|---|
| Level 1: Minimum | Good hygiene practices, general ventilation, and basic PPE |
| Level 2: Technical | Engineering controls such as local exhaust ventilation, enclosed transfer systems, respiratory protection, and monitoring |
| Level 3: Closed | Fully enclosed systems, automated handling, supplied-air protection, continuous monitoring, and work permits |
| Expert | The assessment exceeds standard control banding. Consult an occupational hygienist or certified specialist |
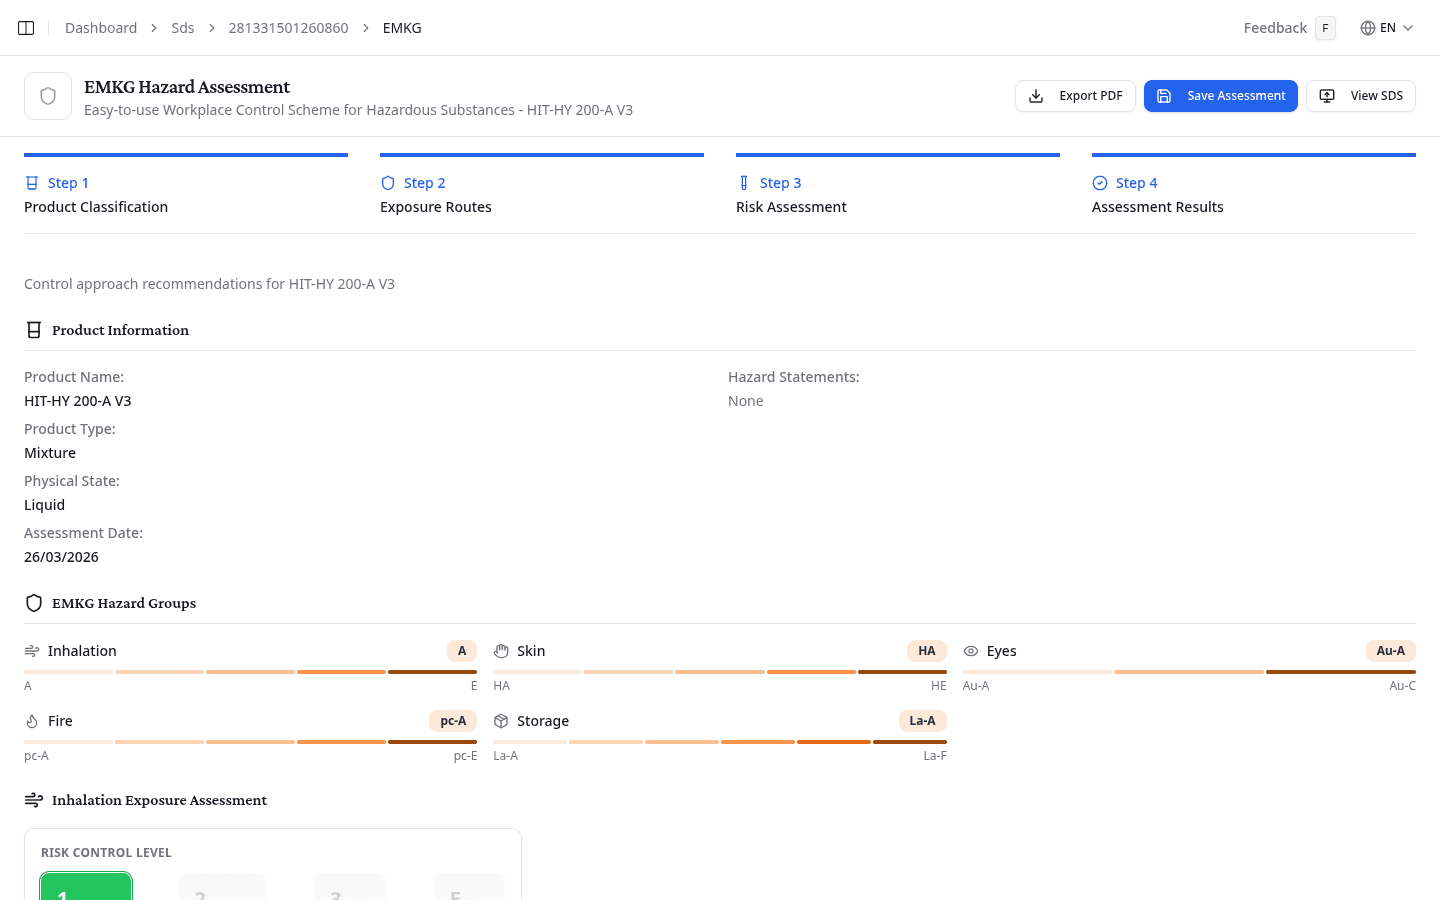
The results page shows a product information summary, an EMKG Hazard Groups overview with colour-coded scales for all five routes, and detailed recommendations for each assessed route.
Save the assessment
Select Save Assessment to store the results and add the product to a location's inventory. In the pop-up window, choose the workplace location from the list, then confirm. The assessment will be linked to that location for future reference.
Export as PDF
Select Export PDF to download a printable report of the full assessment, including all inputs, hazard groups, and control recommendations.
What to do next
For the highest-risk substances, run an ECETOC TRA exposure simulation to model predicted inhalation and dermal exposure against occupational exposure limits. This is particularly useful where you need to demonstrate that exposure stays within limits.